Using the Views button on the Table Toolbar, it is possible to create custom views for the tables on the various tabs,
![]()
Using this option, users can add/remove one or more attributes from the table.

It is NOT possible to edit the DEFAULT view. However, users can copy a default view, rename the view and edit the parameters to be displayed for that view .
![]() How to define a Custom View for a table
How to define a Custom View for a table
1. Navigate to the required tab to view the corresponding table details.
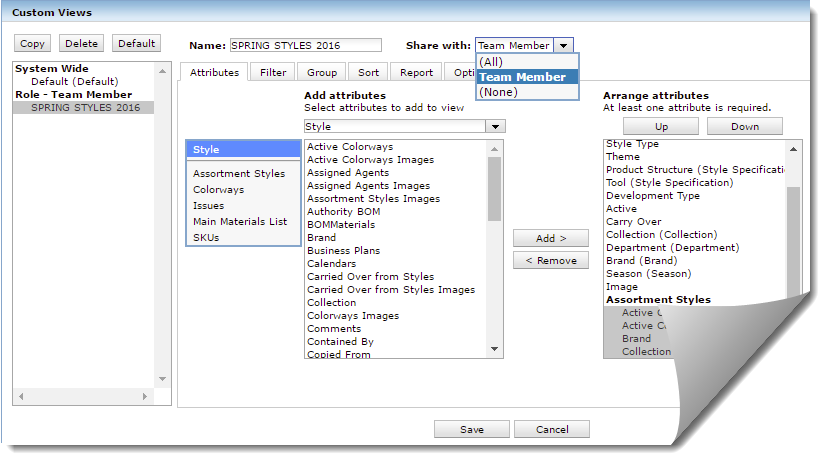
2. On the table toolbar, click on the Views button. The Custom Views dialog box is displayed.
3. Click on the Copy button. A copy of the view is created. In the Name field, type a name for the custom view.
4. The Attributes tab details are displayed by default. In the Add attributes section, select one or more attributes to add to the custom view. To select multiple attributes, press CTRL and LEFT-CLICK simultaneously.
5. Click on the Add > button to add the selected attributes to the custom view. All the selected attributes will now be displayed in the Arrange attributes section.
6. To remove an attribute from the list, in the Arrange attributes section, select the required attribute, then click on < Remove.
ELSE,
7. To arrange the attributes, in the Arrange attributes section, select an attribute and click on either the Up or Down button to move the selected attribute in the required order of display.
8. To save the new custom view, click on Save.
![]() How to delete a Custom View for a table
How to delete a Custom View for a table
1. Navigate to the required tab to view the corresponding table details.
2. On the table toolbar, click on the Views button. The Custom Views dialog box is displayed.
3. All the existing custom views are displayed in the System Wide section. To delete a custom view, click on a view to select it, then click on the Delete button.
4. The selected custom view is deleted and removed from the System Wide selection.
![]() How to share a view with one or more Roles defined in Centric 8
How to share a view with one or more Roles defined in Centric 8
From the Share With drop-down list, select a role with whom you wish to share the custom view.
To save the details, click on the Save button.
The role is created and the custom view is displayed under the selected role name in the System Wide section.
The following tabs are available in the Custom Views dialog box:
Filter, Group, Sort, Report, Options
It is NOT possible to edit the DEFAULT view. However, users can copy a default view. The above tabs are available only on the copy of the DEFAULT view.
___________________________________________________________________________________________
